
How to Travel with an Inflatable Stand Up Paddle Board (iSUP)
Paddle The Current is a participant in the Amazon Services LLC Associates Program, an affiliate advertising program designed to provide a means for sites to earn advertising fees by advertising and linking to Amazon.com or endless.com, MYHABIT.com, SmallParts.com, or AmazonWireless.com.
One of the benefits of owning an inflatable stand up paddle board (iSUP) is portability. Portability means easy travel! If you live in a colder climate like me, you start dreaming about sun and beaches in January and February. Traveling somewhere warm with your iSUP provides a much needed break from the cold while getting your SUP fix! A trip to the mountains for a snowy, winter paddle in a dry suit can be pretty incredible, too.
Tips for Traveling with an Inflatable SUP
Pack your paddle board in an iSUP backpack
You will need an iSUP backpack for any kind of travel, but especially if you want to fly with your iSUP. You can also pack more than just your paddle board in the backpack, which saves luggage space.
Roll your pump inside your paddle board - Rolling your pump inside your board is a huge space saver. Since the pump hose is fragile, remove it before rolling your board and pack it in the bottom of a suitcase. Place the pump on top of the board at one end and start rolling the board just as you would without the pump. I recommend traveling with a single barrel pump for a tighter roll. Once the pump is securely rolled inside the paddle board, place the board inside the backpack.
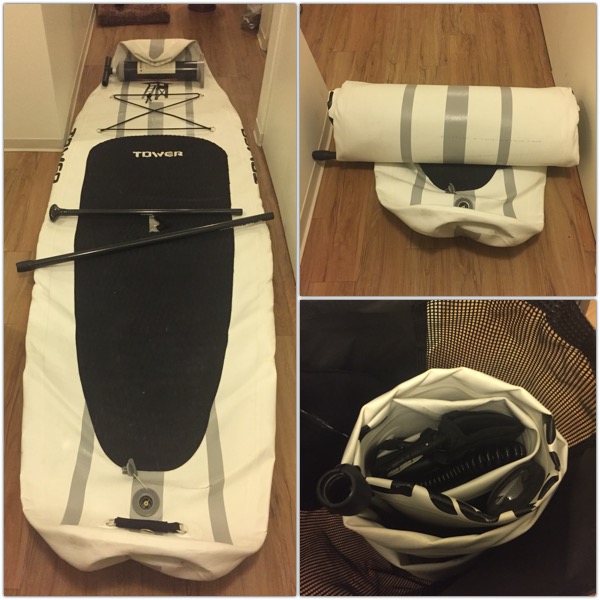
Rolling the pump and paddle inside iSUP
Pack your paddle inside your iSUP backpack - I highly recommend buying a 3- piece paddle even if you only use it for travel. I love my iGK carbon fiber paddle - it’s easy to pack and transport. I place the handle and middle pieces on top of my board as I roll the pump inside. After placing the board inside the backpack, place the blade section inside the bag just outside the board and use a blade cover for extra protection.
Pack your leash and personal flotation device (PFD)
The leash can easily fit inside your iSUP backpack, but the PFD can be tricky. Even though the PFD will fit inside the iSUP backpack, I usually pack mine in my luggage to save inches when checking the dimensions of my backpack. TSA allows life vests with up to two CO2 to be packed in carry-on or checked baggage.
If you pack the PFD in a checked bag, you’ll have no problems. However, I recently packed my life belt in a carry-on and my bag was flagged each time I passed through security. The last TSA agent was nice enough to give me a tip - if you pack a life belt in your carry-on, place it in a bin so the agent can clearly identify it.
Dry bag, towel, camera gear
Don’t forget to pack your dry bag! You’ll still need supplies when you’re on the water and especially in a new place. I like to use a thin towel because it’s easier to pack inside my dry bag or iSUP backpack, so I always bring my designated SUP drying towel. My Earth Pak dry bag packs nicely at the bottom of my suitcase.
If you’re traveling to a scenic location, you’ll want to snap a few pictures. Remember to bring your cameras, chargers, but more importantly, your waterproof phone and camera cases! I love looking back at all the insanely beautiful pictures I have from my trips. I failed to remember a waterproof bag when I traveled to the Dominican Republic a few years ago and have no pictures from an inland river SUP tour - I’m still upset about it, so don’t be me.
Check airlines baggage requirements
Airlines have baggage policies outlining dimensions for a normal checked bag and when your bag falls into the oversize baggage category, which comes along with a hefty fee.
I’ve only flown on Southwest with my iSUP and made it through fee free, here’s how:
Check the dimension and weight restrictions of checked bags on the air carrier’s website.
Measure, measure, measure. Most airlines give a total number for height, width and depth. It’s better to come in a few inches under to give yourself some padding. I’ll admit, the gate agent didn’t pull out a tape measure and check my dimensions, but that is simply luck of the draw.
Weigh your bag with a hanging luggage scale. Make sure everything is packed inside before you weigh your bag.
Pay the oversized bag fee. This is always an option if you just can’t get the dimensions and weight to work, but worth noting in the cost of your trip.
Plan for delays
The first time I traveled with my iSUP, my backpack didn’t make it to my final destination. I’d never lost luggage before, so I really had no idea what to do and I was a little frazzled! Turns out, TSA was curious about my contents and unpacked the bag. Judging by how I received it the next morning - they had a little trouble getting it back together! I’m guessing my backpack was flagged due to the high pressure iSUP pump, but I had pictures for the airline and they delivered it to my hotel the next morning. They graciously offered to pay for any rental fees I might incur and the entire process was fairly seamless. I had no problem flying home, except the bag was in an oversized baggage area of the airport instead of on the baggage claim belt - even though I wasn’t charged for an oversized bag. If you ever lose your iSUP backpack, ask about an oversize baggage area first and if it’s not there, file a claim with the airline.
Traveling with your iSUP is relatively easy and can save money on rental fees, not to mention more freedom to paddle wherever you want at your destination. Even with a few hiccups on my first trip, I’m already planning to travel with my iSUP again!